Table of Contents
Best Lighting for Video Recording or Videography
You can never know too many lighting techniques. Very often your favorite technique doesn’t work in a new situation or time of day. Here are some of the very best and easiest lighting techniques for shooting video.
Jump right to the Lighting Techniques with Multiple Lights:
Recording Indoors
When recording indoors it is important to keep in mind that most of the light is typically unnatural or intentional. We often forget how much we rely on light indoors. We walk in, automatically flip the switch and off we go, without a second thought unless the light doesn’t come on.
But one thing to consider is have you ever been in a room with the light on but needed maybe to read something or other and all the sudden the amount of light in the room suddenly matters? Well, that’s how it works when recording video. The amount, type, color spectrum, and angles of light matter in video more than they do when just using our eyes.
So, you may as yourself, how do I get good lighting for videos? It’s probably not as difficult as you think. We’ll go over a short list of the best methods for lighting video as well as a few great video lighting techniques.
Lighting Techniques and Options for Shooting Video with a Webcam, Phone, or Small Camera
This is one of the go to lighting techniques for everyone. I’m sure you’ve watched many videos online and if you have seen any that had the presenter facing the camera with his or her head and shoulders on screen possibly while sitting behind a desk or table you have seen an example of “talking head” video. This type of video comes across as natural and helps the audience become familiar with the speaker. This allows a speaker, instructor or host to create great rapport quickly.
The secret? Great lighting. The better the lighting the better the video quality will be. No matter how great the content a dimly lit video will make the information less credible or valuable. So what can be done to create great lighting?
Lighting Techniques for Using a Ring Light
One of the easiest lighting options for a talking head video is known as a ring light. A ring light is a circular light that varies from about 4 inches to 24 inches in diameter that can be used with a small camera or cell phone and a tripod. Because your camera mounts in the center of the light ring, it gives off even lighting without any harsh shadows.
Ring lights are a great addition to any lighting kit, it should be one of your first investments. This one on Amazon is great 18” Ring Light and includes:
- 120 pcs LED Blubs can provide a large amount of light;
- Convex lens design obtain well-distributed light to protect eyes;
- Fast heat dissipation material provide ensure safety during use;
- 2900-6000K color temperature, 10 levels of brightness provide multiple-type light;
- Remote control and Bluetooth bring a lot of convenience,
- Easy to assemble.
Of course, there are dozens of other ring lights to choose from on either eBay or Amazon. Here are a few links to compare other ring lights available. eBay Link and Amazon Link. Be sure you choose the best one based on your equipment needs and budget. Depending on your favorite lighting techniques, find the light that fits your list of needs.
Lighting Techniques for Using a Single Reflected Light
The idea here is to use only one light, then with the use of a series of mirrors or reflective surfaces strategically bounce light back and forth to each other, and eventually on to the subject, allowing for great lighting with only minimal film lights used. Most often only one light is used and reflected of the mirrors or reflectors as needed. This takes much more practice and patience, but if you have more time than money, you may want to look at this option.
Single Source Lighting Kit
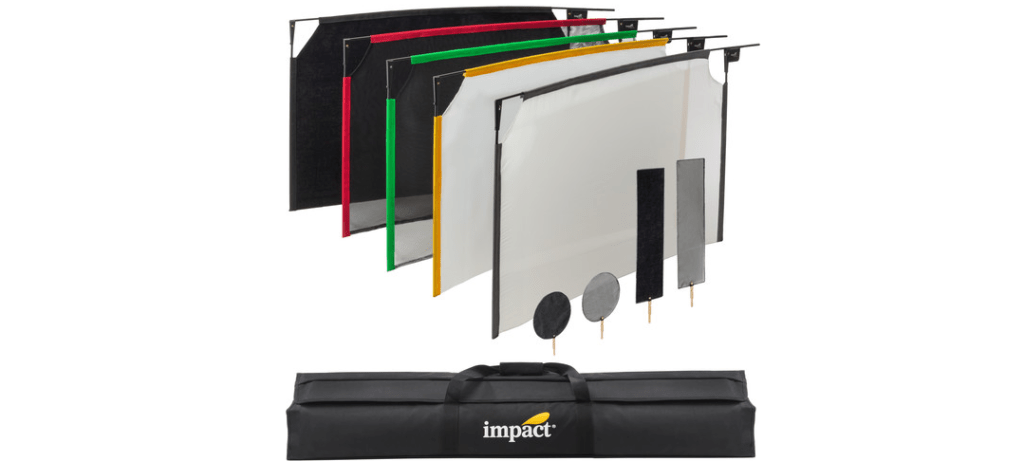
Here is a great kit available from Amazon Impact PortaFrame Scrim Kit (24 x 36) with which you can effectively have up to several sources from only one light.
It contains some of the lesser-known modifiers in imaging, though they have a maximum effect on a production’s subtlety and nuance, especially in close-ups. They also provide the ability to selectively light larger areas. The kit is comprised of five folding, compact, metal frames that accept sleeved fabric modifiers that are stretched into the 24 x 32″ shape when locked into place.
Portability
Impact PortaFrame Scrim Kit fits in a 44 x 11 x 3″ carry case – about 75% more space-efficient than separate components.
Construction
Constructed from durable steel, these three-sided collapsible frames have two arms that fold out from the center bar and lock into place. In combination with the easily interchangeable fabric covers, these flag frames can be easily mounted to any standard grip head. The collapsible frame allows for easy transport and storage.
Versatile
Each type of fabric scrim or screen blocks or diminishes light to a different degree. Having a variety of options at hand means you can fine-tune lighting easily in any situation or environment.
Block Light, Diffuse Light, Reduce Light Intensity
Color-coded for easy identification, each element of the kit blocks the light completely, softens it, or reduces it to a calibrated degree.
Dots and Fingers
Dots and fingers allow you to shape light on smaller objects or areas. They’re ideal for tabletop shooting or in situations where larger fabrics are inconvenient.
Easy Storage
The removable fabric screens and scrims fold up for safe storage and travel inside the carry bag.
Carry Bag
The Carry Bag for the scrim kit protects your flags, frames, and scrims, and keeps everything organized and gathered together in one handy lightweight bag.
This kit is fantastic not only because it can save you money, but for a few other reasons as well. First, is the issue of heat in a small space, if you are filming in a small office, multiple lights can quickly increase the temp, but using only one can keep the heat down. Second, their small footprint allows you to use them in tight spaces where you may otherwise have not been able to rig up lights. Plus, they set up and tear down far faster and easier. Additionally, you won’t have to worry about any light color temperature issues between mixed lighting sources, because all your lighting is essentially coming from a single source.
If you want to save space, and money, or require a more portable solution to add to your existing lighting kit, a reflective system is an excellent option to consider.
Lighting Techniques for Using Tabletop Studio Lights
With 30 inches of height this Linco Tabletop Studio Lighting Kit from Amazon can be ideal for anyone recording talking head videos including online course creators. They are every bit as bright as their full-size freestanding counterparts but are smaller and easier to pack away and store as well. This two-light setup, with 40W (5,500K) bulbs, is ideal for a simple recording setup.
Lighting Techniques for Using Two Simple Lamps
If you need to light in a hurry and don’t have time to order lights before shooting, or have had an issue with your lighting kit, here is a simple temporary fix to get you through. Office or desk lamps work in a pinch if you can track down at least two.
Place one on each side of your camera and point the lights at your face. If you find that the light is a bit too harsh or the shadows to dramatic, you can always use a small clamp or clothes pin to hold a handkerchief or even paper towel over the light to diffuse it, beware and be careful to watch the heat that comes from the lights so you do not start a fire, or burn yourself.
Using Multiple Light Setups for Interview Style Videos
Now that you have chosen your lighting source, it is time to learn how to get the look you want using them. Let’s take a few minutes to discuss the different ways you can attain the look you want with each type of light and what the addition of more lights or sources can do for you and your videos.
Lighting Techniques for Setup Using Two Lights
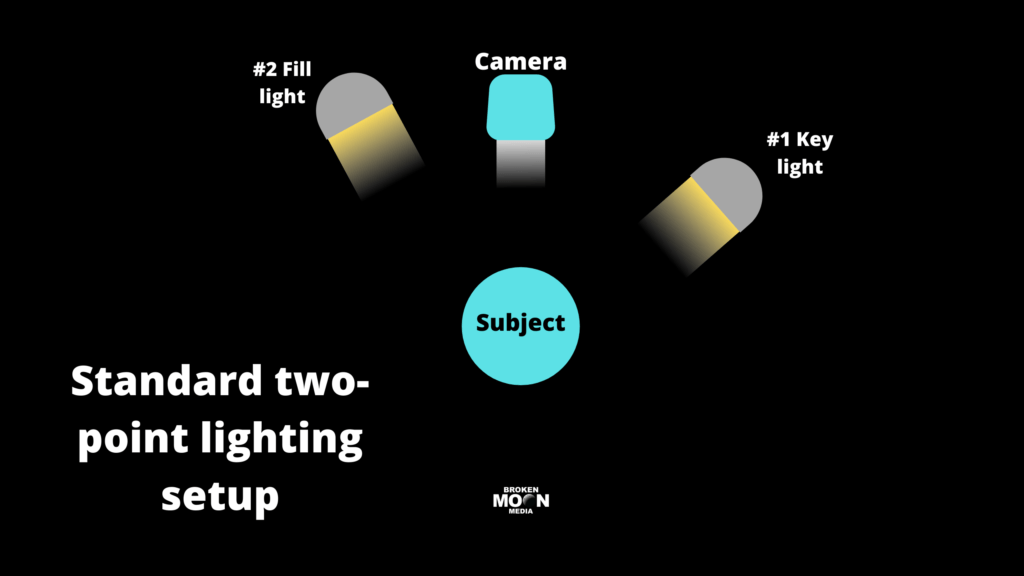
If you decide to use two lights, the two lights have different functions and names to keep them clear. They are called a key light, and a fill light. The key light is the primary source of illumination and is the brighter of the two lights. The fill light complements the key light by softly lighting the areas not illuminated by the key light. As a rule, keep your fill lights around half as bright as key lights. They illuminate and eliminate any harsh shadows.
The setup: Place the two lights on either side of the camera pointing at you, keep them high, just above the eye line. Also, be sure to keep enough distance from the background to reduce shadows.
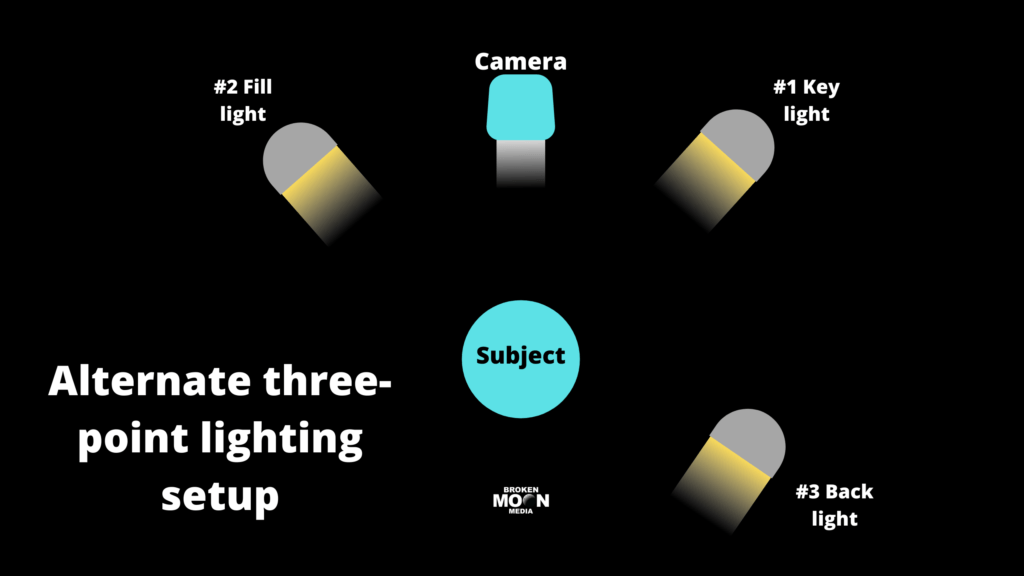
Lighting Techniques for Setup Using Three Lights
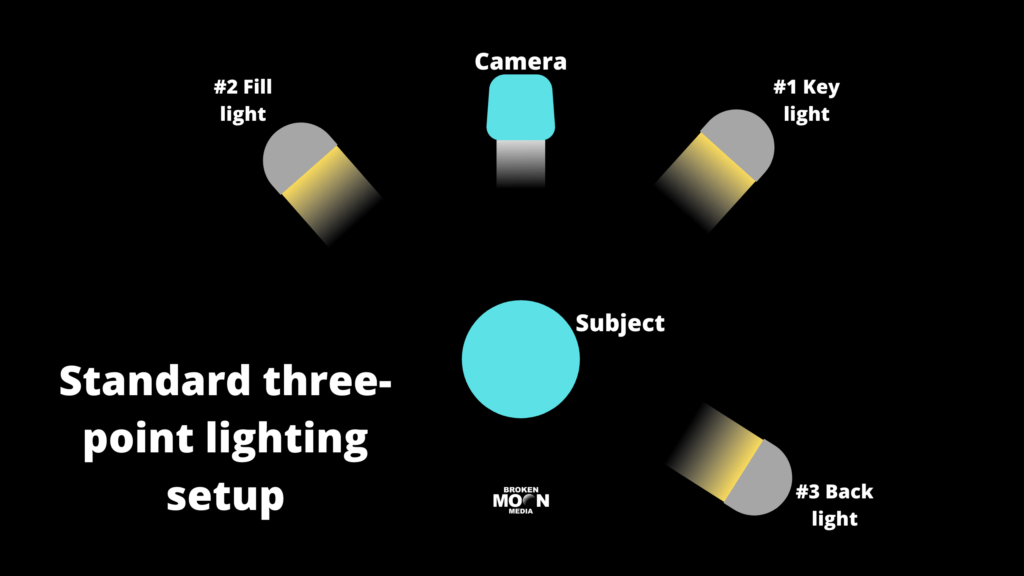
While two lights are enough for most applications you can add a third light too, and add a whole new element to your lighting setup with a backlight. By placing a light behind you pointing toward your back (also known as rim light) you can create beautiful highlights in your hair and body line. This light is also a great way to separate you from the background.
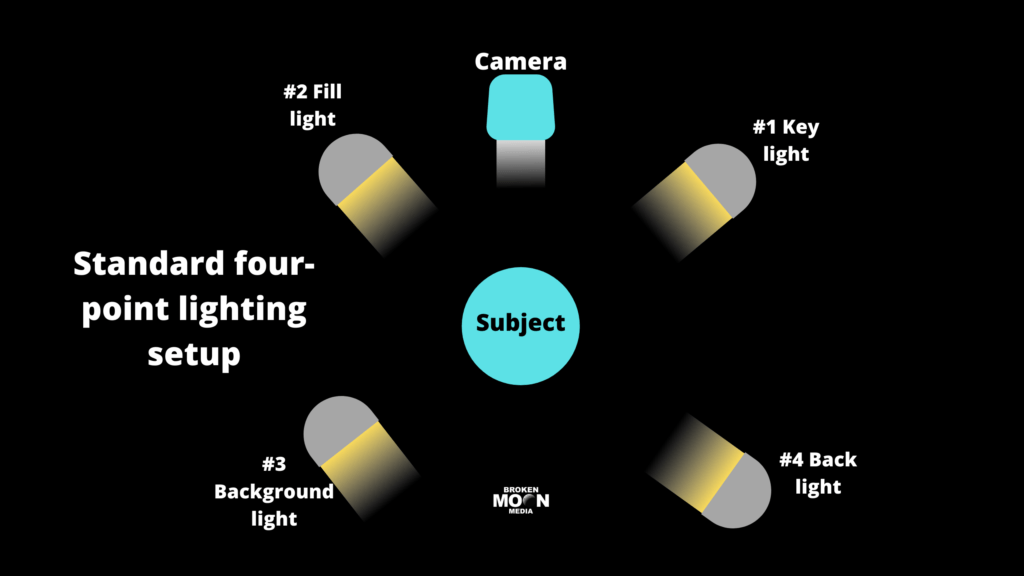
Lighting Techniques for Setup Using Four Lights
This is by no means necessary in many cases but can elevate the look of your video to the next level. This system is the same setup as using three lights, with the simple addition of a background light. The background light is often placed on a stand just behind you facing the wall, try different position heights but often waist height is a good place to start. It brightens the background giving the area additional depth and removes any harsh shadows that might have been created by the other three lights.
You’ll probably be surprised at how just using four lights can instantly and dramatically increase the quality of your videos. Of course, you can adapt your lighting setup by adding or removing lights to achieve various effects depending on the specific type of shot you are looking for.
For instance, with the removal of the fill light, a much more dramatic look can be achieved due t the deep shadows covering half of the face in the shot. Don’t be afraid to try different looks and lighting techniques. There is no right or wrong way to light a video, just general guidelines for different moods.
Here is an easy way to change a harsh light into a much softer tone.
Harsh vs Soft Light
Harsh light is a light that is bright in areas while leaving dark drastic shadows. Typically using only one light will cause the light to be very harsh. It is often desirable to soften the light source to bring less attention to the lighting and more to the subject matter coming from the target in the shot.
How do I change a harsh light into a soft light?

What would otherwise be a harsh light (A) can be softened by reflecting it off the ceiling (B) onto the subject (C). There are many other ideas for reflecting light but reflecting from the top gives a more natural appearance.
Lighting Temperature, tone, and color
A quick reference to see the difference between light temperature and how it fits into the color spectrum is below.

Color temperature on a Kelvin scale, Image Source
Warmer colors give a different feel to the shot, keep in mind the temp of lighting may not be clearly visible in real life but in recorded footage, it is very noticeable. Be sure to do test shots in order to see what the final product is going to be like. It is far easier to change the lighting temp while shooting the video rather than trying to change the temp or feel in post-production during editing. Simpler is better because time is money and if the video is filmed in the proper lighting, it will edit much faster and easier.
Recommendations for Lighting Products
Keep in mind that when choosing the right kind of lighting products, the most important thing is your budget. Plan your budget and then look for the products that fall in your budget range. We have divided the budget into three budget categories: limited budget, midrange budget, and a higher budget.
Limited Budget
If you have a limited budget, don’t worry; great lighting techniques don’t always require high-end equipment. The use of good lighting does not mean your wallet has to take a bullet. There are multiple ways and methods to cut your cost and use cheaper means while still having professional results. For those on a limited budget, the most critical step for you is to know which type of bulb you are going to use for filming the video.
Choosing the Right Bulb Type for Video Recording
Incandescent Bulbs
Incandescent bulbs are the least expensive ones and are classic light bulbs. Therefore, they are the best choice for those with small budgets. They are generally used in residential buildings; therefore, you can go with them if you are filming at home. Incandescent bulbs produce light by heating wire filaments to a certain temperature. You can use multiple incandescent bulbs at the same time to achieve your desired lighting and results. But one thing about incandescent bulbs is that although they are last expensive, they have the shortest lifespans. Thus making them more expensive to operate than LED bulbs and CFL.
LED Bulbs
LED is another widely used bulb that is a great alternative for people with a limited budget. The term LED stands for a light-emitting diode, which has two electrodes for the flow of electricity. Unlike incandescent bulbs, they don’t get too hot. Generally, an LED bulb uses Sony NPF-pattern batteries. They are available in two options daylight, or tungsten balanced LED. Therefore, buy the one that matches perfectly with your overall lights in the scene. Besides, you can also get bi-color lights with both of them or colored diffusers so you can adjust daylight panels to tungsten. There are multiple affordable options available to you, like Aputure Amaran 672.
Halogen Bulbs

Halogen bulbs are like incandescent bulbs; however, they have a longer operating life span. Besides, they also show higher luminous efficiency and color temperature, but the best thing is they use the same amount of power as incandescent bulbs. The only difference they have with the incandescent bulb is that they use inert gas inside the bulb. Therefore, you can use them as a part of your background or as an extra light source. So, they can fill the darker side of your subject on camera.
(CFL) Compact Fluorescent Light Bulbs
In my opinion, CFL bulbs are the best choice for a home video studio lighting kit. Many videographers and photographers use compact fluorescent bulbs to power their lighting kits. They are like mini ceiling bulbs but with a smaller and compact design. To raise improved CRI value and improve color rendering, CFL bulbs come with improved phosphor formation. They have a longer lifespan and are more efficient than incandescent bulbs. The only drawback of a compact fluorescent bulb is that they tend not to be dimmable and are fragile. They are generally available at 35W, 45W, 85W, and 135W power. You can either use Neweer or LimoStudio CFL bulbs.
Midrange Budget
A mid-range budget is a little higher than a limited budget, and therefore, it can give you the freedom to choose more advanced lighting equipment. As a result of which you will be able to buy purpose-built studio lights. They can fall between $100-$500 and include everything one needs to set up their studio.
Usually, these studio lighting kits have large lights and can also include effective diffusion material. But you need to understand at this point that as your budget range increases, you will have more and more LED options. Besides, these LEDs come with numerous features and controls that are mainly similar to the options available at higher prices.
Therefore, to get the best results, you need to find out the kit that includes a light stand for an easy and simple setup. Moreover, they also provide higher total light output. Most of the time, these lights have a few switches on their back. Thus, giving you full control over how many bulbs you want to be lit at one time—therefore giving you a greater level of control over your total output. One of the best choices for the midrange budget is Yongnuo Yn300 Air Pro LED light Controller.
Higher Budget
Finally, we have a higher budget in the list where you can buy high price video lighting kit options. There are multiple fancy features in the lighting products like wireless controls, the ability to change colors, full-range dimmers, and better diffusion on a higher budget. Those who want to shoot high-end camera videos regularly should go with a higher price range. They are worth your investment. Besides, this is the best option for professional filmmaking and video production. Neewer 3 Pack Bi-Color 660 LED Video Light with Stand and Softbox Kit comes with softboxes, and barn door to control and diffuse light output and many other features that are best for the high budget range.
Good lighting is essential for an excellent video. So carefully chose the lighting option based on your budget range.
Lighting Techniques for Shooting Using only Natural lighting; Filming Next to a Window / Zero Cost Lighting.
If you are shooting in the daytime, natural light is the best and most effective option. Moreover, it is a zero-cost lighting option that requires no investment. Besides, it has a number of advantages and benefits. Natural light is a soft light, as a result of which it cannot cause harsh shadows and is best for shooting. Always shoot in the shade or in the room with a window to have natural light for an appropriate amount of light. In case you want to have perfect soft light, then shoot during the golden hours, that is the time of a sunrise or sunset. Keep in mind that natural light changes quickly; therefore, you have to take extra precautions for a long shoot.
How to Use Lighting with Different Backgrounds
Lighting Techniques for Using Backdrops Indoors
Using a perfect backdrop for your shooting is a critical part, and it comes with a wide range of options. These include:
Lighting Techniques for Using the Real Indoor Environment – Your Room
One of the best and most feasible options is to go with your real indoor environment. For shooting a film, especially for your YouTube video or your Vlog, your room is a great choice. If your room has a large window and is well lit with natural light, there is no need to make any changes and use it as it is. However, make sure that your room is well-lit and has a definite amount of sunlight for filming the video. Just make sure your room is clean and tidy and looks good through the eye of a camera.
Lighting Techniques for Using an Imitation Background
If your room faces the sun and has an adequate amount of sunlight, it is great to use it. However, in case it doesn’t go with the theme of your video, you can use an imitation background. You can use seamless paper as your background. To do so, you need to keep in mind a few things like the lighting and the distance between the subject of the video and the camera.
Lighting Techniques for Using a Solid Color Background
I am sure you have seen it somewhere or in some video with a solid color background. We have seen countless videos where people use solid color backgrounds like blue, green, grey color, etc. The solid color background is perfect when you need to focus on your subject. In this way, you can easily emphasize your video subject and give it all the focus it needed.
Lighting Techniques for Using a Blanket or Sheet
You can use a fabric like a blanket or a sheet as a background. However, fully ironed the fabric to remove all wrinkles so you can use it as a background. You need to have a clean and durable blanket or sheet. These backdrops can increase the aesthetics of your backdrop and are extremely good for thumbnails. The color of the blanket or sheet you used is very important as it can substantially impact your video lighting. In my opinion, it is better to use light colors as they can reflect natural light, and you will have an overall better quality of your video.
Lighting Techniques for Using a Plain Wall
Sometimes the best choice is to have nothing. From nothing, I mean there is no need to add anything as a background; instead, you can go with the plain wall. Nothing is sexier and more beautiful than a plain white wall. Moreover, it is the cheapest option on the list, and you don’t have to add anything extra or need to brainstorm to find some creative ideas for filming a video. However, for some people, it may sound boring and dull. Therefore, you can add some pictures on the wall; it can add more depth to the overall picture. Or you can paint your wall in dark-grey, dark-grey-green, or dark-grey-blue colors.
Lighting Techniques for Using a Collapsible, Portable Webcam Background and Green Screen
The next option we have is the collapsible and portable webcam background or a green screen. One of the big names in the industry in this regard is Webaround. They are quite portable, simple, and easy to handle. Moreover, it can be an excellent option, especially for Green Screen. Green screens have a lot of flexibility and can be used in multiple ways. Besides, you can easily have a green screen behind you like you can do a pipe and drape green screen. Another option is to have a collapsible green screen. A green screen is an ideal option for those who want to do silly things.
Lighting Techniques for Using a Professional Background
There are tons of professional backdrops available in the market. If you don’t have time to create a background for yourself, just get a professional background. All photographers use these professional backgrounds. You can opt for a professional background that you can easily mount on the wall or ceiling. Another option is to use a professional background with a stand; however, it takes time to set it up. Moreover, you will need two people to help set the professional background as they are super easy. Professional backgrounds can be paper or fabric.
Lighting Techniques for Using a Whiteboard Background
How about using a whiteboard as a background option? Generally, people never think of using a whiteboard as a background option, but they are an excellent choice. Whiteboards are super reflective and are great for producing glare. You can also write something effective and meaningful that can go well with your video theme. Besides, whiteboards can be extremely memorable, and it is challenging to write pithy sayings or genius equations. Doesn’t it sound plausible and a viable option? A whiteboard background can go well with an office setting or a meeting setup.
Recording Outdoors
Equipment needed for proper outdoor shooting
In case you have chosen to record your videos outside, there is certain equipment you will need. Because now you are filming outside, you need to have taken care of lighting. These include:
An ND Filter
The biggest issue anyone can face when shooting outside is too much light, especially when you film at a location that is overexposed or when the sun is too bright. At this point, ND or Neutral Density filters come in handy as they can darken your video, thus making it look nice. Therefore, every photographer must have an ND filter in their bags. Placing ND filters before the lens can easily reduce the amount of light making its way to the camera. To simply state, ND filters are just like sunglasses that can protect your camera from too much sunlight. Therefore, you can have a perfect amount of lighting for your video.
Reflectors
Another piece of equipment you will need when filming outside is the reflectors. When filming outside, you will need reflectors to have a perfect amount of lighting at some point. By using a reflector, you can fill and control light on the subject of your video. Thus, you can have more flexibility while shooting in a harsh and difficult environment. A reflector can help to create a lighter and a softer second source of light by redirecting light. They are available in different types based on their color. Lastolite offers some of the best reflectors in the market that are the choice of numerous professional photographers and videographers.
Why are There Different Colors in Reflectors?
- The white side reflects the sun and acts as a bounce card.
- A Black side blocks the light from reflecting.
- The gold side reflects warm light.
- A Silver side reflects a lot of light.
- The no-cover reflector softens the light.
Lighting Techniques for Shooting during a Sunny Day
Shooting a video outside, a bright sunny day can either be your best friend or your worst enemy. Although it can provide a lot of light if you are in the right direction at the same time, it can make you look unevenly lit or completely dark. You have to consider numerous things when filming a video in perfect weather. Sun will be your friend if you get them right. When you are shooting on a sunny day, you must not use a flashlight and use lighting equipment like ND filters and reflectors. Besides, another important thing you have to consider is from which direction light is coming.
The light is coming in from front of you
Front lighting is the least dramatic one, and it can illuminate the face of the video subject. When lighting is coming from the front, you won’t have a lot of shadows, and thus you will have a pretty good image in the video. Besides, light from this angle will be easiest to handle and work with. However, at the same time, you have to be careful of stark sunlight. You will get better results generally at dusk or dawn time because these times will have softer light. To have a good video with proper lighting, you should be able to handle its brightness. With front lighting, you will have more predictable results and fewer shadows.
The light is coming from behind you
Lighting from the back is the most dramatic one and is, therefore, a popular option for filming a drama. When lighting is from behind you, it will be quite a trick to handle, but it has some marvelous results if you successfully do. Remember that backlight has a certain amount of depth in it and allows you to play with it for some creative video or a photo; when the sun is just behind the subject, your subject will appear dark with no facial features. However, your subject will definitely love this tone as the scene will explain everything itself and makes the whole situation quite dramatic.
In the High Noon
When you are shooting outside on a sunny day, you will realize that your subject looks good at sunrise or sunset time, known as Golden Hours. Why, because at this time, light falls on them from both sides. However, in the middle of the day, the sun shines directly above your head and casts a strong shadow on the subject. As a result of which it is advised not to shoot a video at high noontime. Therefore, there are times when it is best for a few hours to let the sun move across the horizon before taking a photo. However, if you are already out, you can use photography equipment and your skills to achieve your desired results.
Lighting Techniques for Shooting on a Cloudy Day
Generally, people love to shoot a video on a bright sunny day because it has the best lighting. However, sometimes you have to film a video on a cloudy day. Due to the difference in lighting, you have to use a little different lighting equipment on a cloudy day. Not many of you know, but wide-angle lenses are specially made for photography on a cloudy day. Use clouds to your advantage to have a perfect video by using them as a diffuser to create an even light. Besides, when you are shooting, try to shoot from above your subject so that they can get enough light. Moreover, you can also use your surroundings to create additional light.
Lighting Techniques for Shooting at the Golden Hour
Time just before sunrise or sunset is referred to as the Golden Hour. Basically, during the Golden Hours sun sends more diffused light than any other time of the day. And therefore, it casts a soft glow on everything. Besides, there are not many shadows at this time, and thus it will give an overall ethereal look. Thus, it can cause even the most mundane objects to look stunning. Due to all this, these hours are considered just perfect for photography and videography and capturing great videos. Although it has the best and most suitable lighting at this time still there are other factors you have to consider for perfect videos. At this time, light can change dramatically; therefore, you have to make sure that your camera cannot make an error due to this.
Lighting Techniques for Using the Sun as a Backlight
To all photographer beginners, it is always advised to use the sun as a front light for filming a video. Because when you use the sun as a backlight, it can create strong sun rays and are therefore responsible for creating an unwanted sun flare. As a result of which you have to use a lens hood or a photography umbrella kit. This equipment can help you to fight an overpowering lens flare. Moreover, when you are using the sun as a backlight, make sure to choose the right time for shooting and try to create a starburst effect. These days Japanese style photography is getting popular where you can use soft backlighting and a beautiful lens flare.
Do you Need Lighting? Get it here
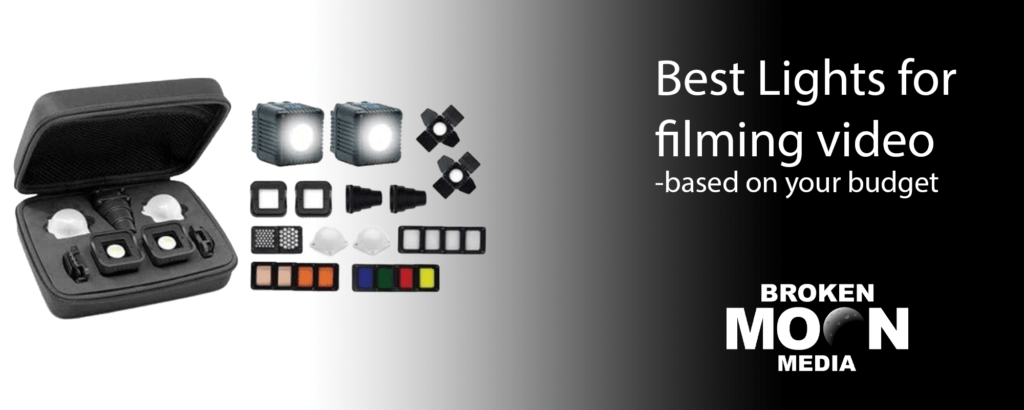
Figuring out what lighting is best for your needs requires technical info, it also requires knowing your budget. When you know both, and want to compare the best lights in different budget levels, we have taken care of that for you as well. Check Out our article: The Best Lights for filming Video on a Budget.
Are You Looking for a Great Motivational Coach?
Aaron Jarrels on the aaronjarrels.com website is offering some amazing coaching for industry leaders and business owners, especially those who suffer needlessly with symptoms of Impostor Syndrome.
SIGN UP NOW AND RECEIVE BONUS DOWNLOADS
SUBSCRIBE TO OUR MONTHLY NEWSLETTER FOR EXCLUSIVE CONTENT
We value your privacy and time, we promise not to sell, share, or use your email to send any junk. We only send monthly emails when we have valuable info, content, freebies, and usable downloads for you. That's a promise. - Broken Moon Media

